Writing ASP.NET Core integration tests – Automated Testing

When Microsoft built ASP.NET Core from the ground up, they fixed and improved so many things that I cannot enumerate them all here, including testability.Nowadays, there are two ways to structure a .NET program:

  • The classic ASP.NET Core Program and the Startup classes. This model might be found in existing projects (created before .NET 6).
  • The minimal hosting model introduced in .NET 6. This may look familiar to you if you know Node.js, as this model encourages you to write the start-up code in the Program.cs file by leveraging top-level statements. You will most likely find this model in new projects (created after the release of .NET 6).

No matter how you write your program, that’s the place to define how the application’s composition and how it boots. Moreover, we can leverage the same testing tools more or less seamlessly.In the case of a web application, the scope of our integration tests is often to call the endpoint of a controller over HTTP and assert the response. Luckily, in .NET Core 2.1, the .NET team added the WebApplicationFactory<TEntry> class to make the integration testing of web applications easier. With that class, we can boot up an ASP.NET Core application in memory and query it using the supplied HttpClient in a few lines of code. The test classes also provide extension points to configure the server, such as replacing implementations with mocks, stubs, or other test-specific elements.Let’s start by booting up a classic web application test.

Classic web application

In a classic ASP.NET Core application, the TEntry generic parameter of the WebApplicationFactory<TEntry> class is usually the Startup or Program class of your project under test.

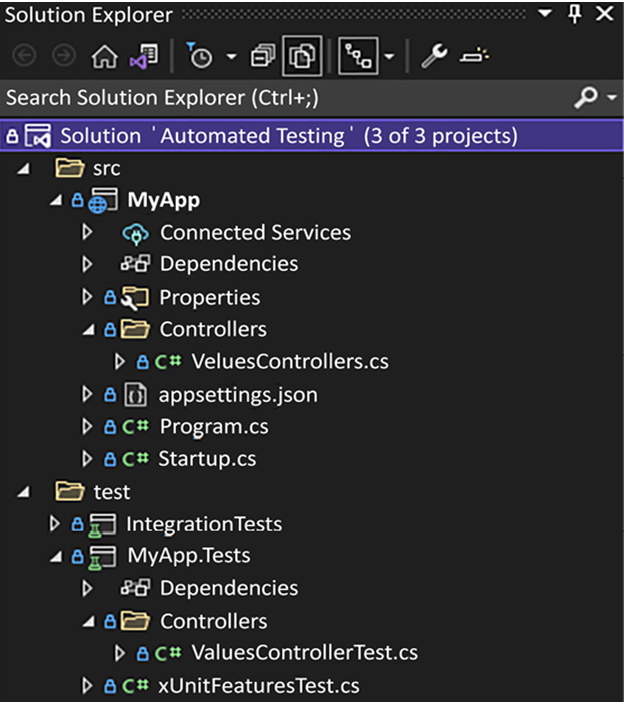
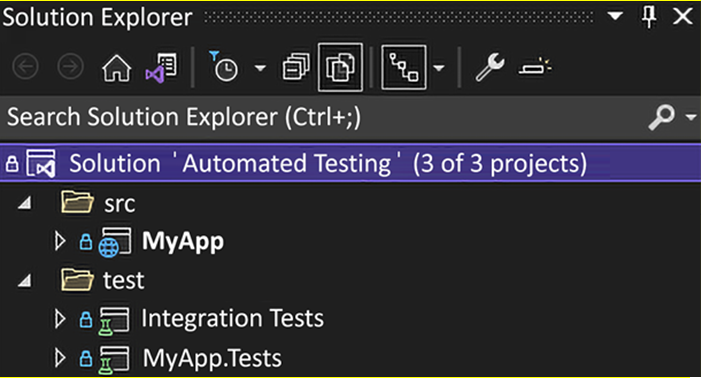
The test cases are in the Automated Testing solution under the MyApp.IntegrationTests project.

Let’s start by looking at the test code structure before breaking it down:

namespace MyApp.IntegrationTests.Controllers;
public class ValuesControllerTest : IClassFixture<WebApplicationFactory<Startup>>
{
    private readonly HttpClient _httpClient;
    public ValuesControllerTest(
        WebApplicationFactory<Startup> webApplicationFactory)
    {
        _httpClient = webApplicationFactory.CreateClient();
    }
    public class Get : ValuesControllerTest
    {
        public Get(WebApplicationFactory<Startup> webApplicationFactory)
            : base(webApplicationFactory) { }
        [Fact]
        public async Task Should_respond_a_status_200_OK()
        {
            // Omitted Test Case 1
        }
        [Fact]
        public async Task Should_respond_the_expected_strings()
        {
            // Omitted Test Case 2
        }
    }
}

The first piece of the preceding code that is relevant to us is how we get an instance of the WebApplicationFactory<Startup> class. We inject a WebApplicationFactory<Startup> object into the constructor by implementing the IClassFixture<T> interface (a xUnit feature). We can also use the factory to configure the test server, but we don’t need to here, so we can only keep a reference on the HttpClient, preconfigured to connect to the in-memory test server.Then, we may have noticed we have the nested Get class that inherits the ValuesControllerTest class. The Get class contains the test cases. By inheriting the ValuesControllerTest class, we can leverage the _httpClient field from the test cases we are about to see.In the first test case, we use HttpClient to query the http://localhost/api/values URI, accessible through the in-memory server. Then, we assert that the status code of the HTTP response was a success (200 OK):

[Fact]
public async Task Should_respond_a_status_200_OK()
{
    // Act
    var result = await _httpClient
        .GetAsync(“/api/values”);
    // Assert
    Assert.Equal(HttpStatusCode.OK, result.StatusCode);
}

The second test case also sends an HTTP request to the in-memory server but deserializes the body’s content as a string[] to ensure the values are the same as expected instead of validating the status code:

[Fact]
public async Task Should_respond_the_expected_strings()
{
    // Act
    var result = await _httpClient
        .GetFromJsonAsync<string[]>(“/api/values”);
    // Assert
    Assert.Collection(result,
        x => Assert.Equal(“value1”, x),
        x => Assert.Equal(“value2”, x)
    );
}

As you may have noticed from the test cases, the WebApplicationFactory preconfigured the BaseAddress property for us, so we don’t need to prefix our requests with http://localhost.

When running those tests, an in-memory web server starts. Then, HTTP requests are sent to that server, testing the complete application. The tests are simple in this case, but you can create more complex test cases in more complex programs.Next, we explore how to do the same for minimal APIs.

Test class name – Automated Testing

By convention, I name test classes [class under test]Test.cs and create them in the same directory as in the original project. Finding tests is easy when following that simple rule since the test code is in the same location of the file tree as the code under test but in two distinct projects.

 Figure 2.8: The Automated Testing Solution Explorer, displaying how tests are organizedFigure 2.8: The Automated Testing Solution Explorer, displaying how tests are organized 

Test code inside the test class

For the test code itself, I follow a multi-level structure similar to the following:

  • One test class is named the same as the class under test.
  • One nested test class per method to test from the class under test.
  • One test method per test case of the method under test.

This technique helps organize tests by test case while keeping a clear hierarchy, leading to the following hierarchy:

  • Class under test
  • Method under test
  • Test case using that method

In code, that translates to the following:

namespace MyApp.IntegrationTests.Controllers;
public class ValuesControllerTest
{
    public class Get : ValuesControllerTest
    {
        [Fact]
        public void Should_return_the_expected_strings()
        {
            // Arrange
            var sut = new ValuesController();
            // Act
            var result = sut.Get();
            // Assert
            Assert.Collection(result.Value,
                x => Assert.Equal(“value1”, x),
                x => Assert.Equal(“value2”, x)
            );
        }
    }
}

This convention allows you to set up tests step by step. For example, by inheriting the outer class (the ValuesControllerTest class here) from the inner class (the Get nested class), you can create top-level private mocks or classes shared by all nested classes and test methods. Then, for each method to test, you can modify the setup or create other private test elements in the nested classes. Finally, you can do more configuration per test case inside the test method (the Should_return_the_expected_strings method here).

Don’t go too hard on reusability inside your test classes, as it can make tests harder to read from an external eye, such as a reviewer or another developer that needs to play there. Unit tests should remain focused, small, and easy to read: a unit of code testing another unit of code. Too much reusability may lead to a brittle test suite.

Now that we have explored organizing unit tests, let’s look at integration tests.

Integration tests

Integration tests are harder to organize because they depend on multiple units, can cross project boundaries, and interact with various dependencies.We can create one integration test project for most simple solutions or many for more complex scenarios.When creating one, you can name the project IntegrationTests or start with the entry point of your tests, like a REST API project, and name the project [Name of the API project].IntegrationTests. At this point, how to name the integration test project depends on your solution structure and intent.When you need multiple integration projects, you can follow a convention similar to unit tests and associate your integration projects one-to-one: [Project under test].IntegrationTests.Inside those projects, it depends on how you want to attack the problem and the structure of the solution itself. Start by identifying the features under test. Name the test classes in a way that mimics your requirements, organize those into sub-folders (maybe a category or group of requirements), and code test cases as methods. You can also leverage nested classes, as we did with unit tests.

We write tests throughout the book, so you will have plenty of examples to make sense of all this if it’s not clear now.

Next, we implement an integration test by leveraging ASP.NET Core features.

Organizing your tests – Automated Testing

There are many ways of organizing test projects inside a solution, and I tend to create a unit test project for each project in the solution and one or more integration test projects.A unit test is directly related to a single unit of code, whether it’s a method or a class. It is straightforward to associate a unit test project with its respective code project (assembly), leading to a one-on-one relationship. One unit test project per assembly makes them portable, easier to navigate, and even more so when the solution grows.

If you have a preferred way to organize yours that differs from what we are doing in the book, by all means, use that approach instead.

Integration tests, on the other hand, can span multiple projects, so having a single rule that fits all scenarios is challenging. One integration test project per solution is often enough. Sometimes we can need more than one, depending on the context.

I recommend starting with one integration test project and adding more as needed during development instead of overthinking it before getting started. Trust your judgment; you can always change the structure as your project evolves.

Folder-wise, at the solution level, creating the application and its related libraries in an src directory helps isolate the actual solution code from the test projects created under a test directory, like this:

 Figure 2.7: The Automated Testing Solution Explorer, displaying how the projects are organizedFigure 2.7: The Automated Testing Solution Explorer, displaying how the projects are organized 

That’s a well-known and effective way of organizing a solution in the .NET world.

Sometimes, it is not possible or unwanted to do that. One such use case would be multiple microservices written under a single solution. In that case, you might want the tests to live closer to your microservices and not split them between src and test folders. So you could organize your solution by microservice instead, like one directory per microservice that contains all the projects, including tests.

Let’s now dig deeper into organizing unit tests.

Unit tests

How you organize your test projects may make a big difference between searching for your tests or making it easy to find them. Let’s look at the different aspects, from the namespace to the test code itself.

Namespace

I find it convenient to create unit tests in the same namespace as the subject under test when creating unit tests. That helps get tests and code aligned without adding any additional using statements. To make it easier when creating files, you can change the default namespace used by Visual Studio when creating a new class in your test project by adding <RootNamespace>[Project under test namespace]</RootNamespace> to a PropertyGroup of the test project file (*.csproj), like this:<PropertyGroup>
  …
<RootNamespace>MyApp</RootNamespace>
</PropertyGroup>

Closing words – Automated Testing

Now that facts, theories, and assertions are out of the way, xUnit offers other mechanics to allow developers to inject dependencies into their test classes. These are named fixtures. Fixtures allow dependencies to be reused by all test methods of a test class by implementing the IClassFixture<T> interface. Fixtures are very helpful for costly dependencies, like creating an in-memory database. With fixtures, you can create the dependency once and use it multiple times. The ValuesControllerTest class in the MyApp.IntegrationTests project shows that in action.It is important to note that xUnit creates an instance of the test class for every test run, so your dependencies are recreated every time if you are not using the fixtures.You can also share the dependency provided by the fixture between multiple test classes by using ICollectionFixture<T>, [Collection], and [CollectionDefinition] instead. We won’t get into the details here, but at least you know it’s possible and know what types to look for when you need something similar.Finally, if you have worked with other testing frameworks, you might have encountered setup and teardown methods. In xUnit, there are no particular attributes or mechanisms for handling setup and teardown code. Instead, xUnit uses existing OOP concepts:

  • To set up your tests, use the class constructor.
  • To tear down (clean up) your tests, implement IDisposable or IAsyncDisposable and dispose of your resources there.

That’s it, xUnit is very simple and powerful, which is why I adopted it as my main testing framework several years ago and chose it for this book.Next, we learn to write readable test methods.

Arrange, Act, Assert

Arrange, Act, Assert (AAA or 3A) is a well-known method for writing readable tests. This technique allows you to clearly define your setup (arrange), the operation under test (act), and your assertions (assert). One efficient way to use this technique is to start by writing the 3A as comments in your test case and then write the test code in between. Here is an example:

[Fact]
public void Should_be_equals()
{
    // Arrange
    var a = 1;
    var b = 2;
    var expectedResult = 3;
    // Act
    var result = a + b;
    // Assert
    Assert.Equal(expectedResult, result);
}

Of course, that test case cannot fail, but the three blocks are easily identifiable with the 3A comments.In general, you want the Act block of your unit tests to be a single line, making the test focus clear. If you need more than one line, the chances are that something is wrong in the test or the design.

When the tests are very small (only a few lines), removing the comments might help readability. Furthermore, when you have nothing to set up in your test case, delete the Arrange comment to improve its readability further.

Next, we learn how to organize tests into projects, directories, and files.

Theories – Automated Testing-2

The third data feeds three more sets of data to the test method. However, that data originates from the GetData method of the ExternalData class, sending 10 as an argument during the execution (the start parameter). To do that, we must specify the MemberType instance where the method is located so xUnit knows where to look. In this case, we pass the argument 10 as the second parameter of the MemberData constructor. However, in other cases, you can pass zero or more arguments there.Finally, we are doing the same for the ExternalData.TypedData property, which is represented by the [MemberData(nameof(ExternalData.TypedData), MemberType = typeof(ExternalData))] attribute. Once again, the only difference is that the property is defined using TheoryData instead of IEnumerable<object[]>, which makes its intent clearer.When running the tests, the data provided by the [MemberData] attributes are combined, yielding the following result in the Test Explorer:

 Figure 2.5: Member data theory test resultsFigure 2.5: Member data theory test results 

These are only a few examples of what we can do with the [MemberData] attribute.

I understand that’s a lot of condensed information, but the goal is to cover just enough to get you started. I don’t expect you to become an expert in xUnit by reading this chapter.

Last but not least, the [ClassData] attribute gets its data from a class implementing IEnumerable<object[]> or inheriting from TheoryData<…>. The concept is the same as the other two. Here is an example:

public class ClassDataTest
{
    [Theory]
    [ClassData(typeof(TheoryDataClass))]
    [ClassData(typeof(TheoryTypedDataClass))]
    public void Should_be_equal(int value1, int value2, bool shouldBeEqual)
    {
        if (shouldBeEqual)
        {
            Assert.Equal(value1, value2);
        }
        else
        {
            Assert.NotEqual(value1, value2);
        }
    }
    public class TheoryDataClass : IEnumerable<object[]>
    {
        public IEnumerator<object[]> GetEnumerator()
        {
            yield return new object[] { 1, 2, false };
            yield return new object[] { 2, 2, true };
            yield return new object[] { 3, 3, true };
        }
        IEnumerator IEnumerable.GetEnumerator() => GetEnumerator();
    }
    public class TheoryTypedDataClass : TheoryData<int, int, bool>
    {
        public TheoryTypedDataClass()
        {
            Add(102, 104, false);
        }
    }
}

These are very similar to [MemberData], but we point to a type instead of pointing to a member.In TheoryDataClass, implementing the IEnumerable<object[]> interface makes it easy to yield return the results. On the other hand, in the TheoryTypedDataClass class, by inheriting TheoryData, we can leverage a list-like Add method. Once again, I find inheriting from TheoryData more explicit, but either way works with xUnit. You have many options, so choose the best one for your use case.Here is the result in the Test Explorer, which is very similar to the other attributes:

 Figure 2.6: Test ExplorerFigure 2.6: Test Explorer 

That’s it for the theories—next, a few last words before organizing our tests.

Theories – Automated Testing-1

For more complex test cases, we can use theories. A theory contains two parts:

  • A [Theory] attribute that marks the method as a theory.
  • At least one data attribute that allows passing data to the test method: [InlineData], [MemberData], or [ClassData].

When writing a theory, your primary constraint is ensuring that the number of values matches the parameters defined in the test method. For example, a theory with one parameter must be fed one value. We look at some examples next.

You are not limited to only one type of data attribute; you can use as many as you need to suit your needs and feed a theory with the appropriate data.

The [InlineData] attribute is the most suitable for constant values or smaller sets of values. Inline data is the most straightforward way of the three because of the proximity of the test values and the test method.Here is an example of a theory using inline data:

public class InlineDataTest
{
    [Theory]
    [InlineData(1, 1)]
    [InlineData(2, 2)]
    [InlineData(5, 5)]
    public void Should_be_equal(int value1, int value2)
    {
        Assert.Equal(value1, value2);
    }
}

That test method yields three test cases in the Test Explorer, where each can pass or fail individually. Of course, since 1 equals 1, 2 equals 2, and 5 equals 5, all three test cases are passing, as shown here:

 Figure 2.4: Inline data theory test resultsFigure 2.4: Inline data theory test results 

We can also use the [MemberData] and [ClassData] attributes to simplify the test method’s declaration when we have a large set of data to tests. We can also do that when it is impossible to instantiate the data in the attribute. We can also reuse the data in multiple test methods or encapsulate the data away from the test class.Here is a medley of examples of the [MemberData] attribute usage:

public class MemberDataTest
{
    public static IEnumerable<object[]> Data => new[]
    {
        new object[] { 1, 2, false },
        new object[] { 2, 2, true },
        new object[] { 3, 3, true },
    };
    public static TheoryData<int, int, bool> TypedData =>new TheoryData<int, int, bool>
    {
        { 3, 2, false },
        { 2, 3, false },
        { 5, 5, true },
    };
    [Theory]
    [MemberData(nameof(Data))]
    [MemberData(nameof(TypedData))]
    [MemberData(nameof(ExternalData.GetData), 10, MemberType = typeof(ExternalData))]
    [MemberData(nameof(ExternalData.TypedData), MemberType = typeof(ExternalData))]
    public void Should_be_equal(int value1, int value2, bool shouldBeEqual)
    {
        if (shouldBeEqual)
        {
            Assert.Equal(value1, value2);
        }
        else
        {
            Assert.NotEqual(value1, value2);
       }
    }
    public class ExternalData
    {
        public static IEnumerable<object[]> GetData(int start) => new[]
        {
            new object[] { start, start, true },
            new object[] { start, start + 1, false },
            new object[] { start + 1, start + 1, true },
        };
        public static TheoryData<int, int, bool> TypedData => new TheoryData<int, int, bool>
        {
            { 20, 30, false },
            { 40, 50, false },
            { 50, 50, true },
        };
    }
}

The preceding test case yields 12 results. If we break it down, the code starts by loading three sets of data from the Data property by decorating the test method with the [MemberData(nameof(Data))] attribute. This is how to load data from a member of the class the test method is declared in.Then, the second property is very similar to the Data property but replaces IEnumerable<object[]> with a TheoryData<…> class, making it more readable and type-safe. Like with the first attribute, we feed those three sets of data to the test method by decorating it with the [MemberData(nameof(TypedData))] attribute. Once again, it is part of the test class.

I strongly recommend using TheoryData<…> by default.

Assertions – Automated Testing

An assertion is a statement that checks whether a particular condition is true or false. If the condition is true, the test passes. If the condition is false, the test fails, indicating a problem with the subject under test.Let’s visit a few ways to assert correctness. We use barebone xUnit functionality in this section, but you can bring in the assertion library of your choice if you have one.

In xUnit, the assertion throws an exception when it fails, but you may never even realize that. You do not have to handle those; that’s the mechanism to propagate the failure result to the test runner.

We won’t explore all possibilities, but let’s start with the following shared pieces:

public class AssertionTest
{
    [Fact]
    public void Exploring_xUnit_assertions()
    {
        object obj1 = new MyClass { Name = “Object 1” };
        object obj2 = new MyClass { Name = “Object 1” };
        object obj3 = obj1;
        object?
obj4 = default(MyClass);
        //
        // Omitted assertions
        //
        static void OperationThatThrows(string name)
        {
            throw new SomeCustomException { Name = name };
        }
    }
    private record class MyClass
    {
        public string?
Name { get; set; }
    }
    private class SomeCustomException : Exception
    {
        public string?
Name { get; set; }
    }
}

The two preceding record classes, the OperationThatThrows method, and the variables are utilities used in the test to help us play with xUnit assertions. The variables are of type object for exploration purposes, but you can use any type in your test cases. I omitted the assertion code that we are about to see to keep the code leaner.The following two assertions are very explicit:

Assert.Equal(expected: 2, actual: 2);
Assert.NotEqual(expected: 2, actual: 1);

The first compares whether the actual value equals the expected value, while the second compares if the two values are different. Assert.Equal is probably the most commonly used assertion method.

As a rule of thumb, it is better to assert equality (Equal) than assert that the values are different (NotEqual). Except in a few rare cases, asserting equality will yield more consistent results and close the door to missing defects.

The next two assertions are very similar to the equality ones but assert that the objects are the same instance or not (the same instance means the same reference):

Assert.Same(obj1, obj3);
Assert.NotSame(obj2, obj3);

The next one validates that the two objects are equal. Since we are using record classes, it makes it super easy for us; obj1 and obj2 are not the same (two instances) but are equal (see Appendix A for more information on record classes):

Assert.Equal(obj1, obj2);

The next two are very similar and assert that the value is null or not:

Assert.Null(obj4);
Assert.NotNull(obj3);

The next line asserts that obj1 is of the MyClass type and then returns the argument (obj1) converted to the asserted type (MyClass). If the type is incorrect, the IsType method will throw an exception:

var instanceOfMyClass = Assert.IsType<MyClass>(obj1);

Then we reuse the Assert.Equal method to validate that the value of the Name property is what we expect:

Assert.Equal(expected: “Object 1”, actual: instanceOfMyClass.Name);

The following code block asserts that the testCode argument throws an exception of the SomeCustomException type:

var exception = Assert.Throws<SomeCustomException>(
    testCode: () => OperationThatThrows(“Toto”)
);

The testCode argument executes the OperationThatThrows inline function we saw initially. The Throws method allows us to test some exception properties by returning the exception in the specified type. The same behavior as the IsType method happens here; if the exception is of the wrong type or no exception is thrown, the Throws method will fail the test.

It is a good idea to ensure that not only the proper exception type is thrown, but the exception carries the correct values as well.

The following line asserts that the value of the Name property is what we expect it to be, ensuring our program would propagate the proper exception:

Assert.Equal(expected: “Toto”, actual: exception.Name);

We covered a few assertion methods, but many others are part of xUnit, like the Collection, Contains, False, and True methods. We use many assertions throughout the book, so if these are still unclear, you will learn more about them.Next, let’s look at data-driven test cases using theories.

How to create an xUnit test project – Automated Testing

To create a new xUnit test project, you can run the dotnet new xunit command, and the CLI does the job for you by creating a project containing a UnitTest1 class. That command does the same as creating a new xUnit project from Visual Studio.For unit testing projects, name the project the same as the project you want to test and append .Tests to it. For example, MyProject would have a MyProject.Tests project associated with it. We explore more details in the Organizing your tests section below.The template already defines all the required NuGet packages, so you can start testing immediately after adding a reference to your project under test.

You can also add project references using the CLI with the dotnet add reference command. Assuming we are in the ./test/MyProject.Tests directory and the project file we want to reference is in the ./src/MyProject directory; we can execute the following command to add a reference:

dotnet add reference ../../src/MyProject.csproj.

Next, we explore some xUnit features that will allow us to write test cases.

Key xUnit features

In xUnit, the [Fact] attribute is the way to create unique test cases, while the [Theory] attribute is the way to make data-driven test cases. Let’s start with facts, the simplest way to write a test case.

Facts

Any method with no parameter can become a test method by decorating it with a [Fact] attribute, like this:

public class FactTest
{
    [Fact]
    public void Should_be_equal()
    {
        var expectedValue = 2;
        var actualValue = 2;
        Assert.Equal(expectedValue, actualValue);
    }
}

You can also decorate asynchronous methods with the fact attribute when the code under test needs it:

public class AsyncFactTest
{
    [Fact]
    public async Task Should_be_equal()
    {
        var expectedValue = 2;
        var actualValue = 2;
        await Task.Yield();
        Assert.Equal(expectedValue, actualValue);
    }
}

In the preceding code, the highlighted line conceptually represents an asynchronous operation and does nothing more than allow using the async/await keywords.When we run the tests from Visual Studio’s Test Explorer, the test run result looks like this:

 Figure 2.3: Test results in Visual StudioFigure 2.3: Test results in Visual Studio 

You may have noticed from the screenshot that the test classes are nested in the xUnitFeaturesTest class, part of the MyApp namespace, and under the MyApp.Tests project. We explore those details later in the chapter.Running the dotnet test CLI command should yield a result similar to the following:

Passed! 
– Failed:     0, Passed:    23, Skipped:     0, Total:    23, Duration: 22 ms – MyApp.Tests.dll (net8.0)

As we can read from the preceding output, all tests are passing, none have failed, and none were skipped. It is as simple as that to create test cases using xUnit.

Learning the CLI can be very helpful in creating and debugging CI/CD pipelines, and you can use them, like the dotnet test command, in any script (like bash and PowerShell).

Have you noticed the Assert keyword in the test code? If you are not familiar with it, we will explore assertions next.

State Transition Testing – Automated Testing

We usually use State Transition Testing to test software with a state machine since it tests the different system states and their transitions. It’s handy for systems where the system behavior can change based on its current state. For example, a program with states like “logged in” or “logged out”.To perform State Transition Testing, we need to identify the states of the system and then the possible transitions between the states. For each transition, we need to create a test case. The test case should test the software with the specified input values and verify that the software transitions to the correct state. For example, a user with the state “logged in” must transition to the state “logged out” after signing out.The main advantage of State Transition Testing is that it tests sequences of events, not just individual events, which could reveal defects not found by testing each event in isolation. However, State Transition Testing can become complex and time-consuming for systems with many states and transitions.

Use Case Testing

This technique validates that the system behaves as expected when used in a particular way by a user. Use cases could have formal descriptions, be user stories, or take any other form that fits your needs.A use case involves one or more actors executing steps or taking actions that should yield a particular result. A use case can include inputs and expected outputs. For example, when a user (actor) that is “signed in” (precondition) clicks the “sign out” button (action), then navigates to the profile page (action), the system denies access to the page and redirects the users to the sign in page, displaying an error message (expected behaviors).Use case testing is a systematic and structured approach to testing that helps identify defects in the software’s functionality. It is very user-centric, ensuring the software meets the users’ needs. However, creating test cases for complex use cases can be difficult. In the case of a user interface, the time to execute end-to-end tests of use cases can take a long time, especially as the number of tests grows.

It is an excellent approach to think of your test cases in terms of functionality to test, whether using a formal use case or just a line written on a napkin. The key is to test behaviors, not code.

Now that we have explored these techniques, it is time to introduce the xUnit library, ways to write tests, and how tests are written in the book. Let’s start by creating a test project.

Equivalence Partitioning – Automated Testing

This technique divides the input data of the software into different equivalence data classes and then tests these classes rather than individual inputs. An equivalence data class means that all values in that partition set should lead to the same outcome or yield the same result. Doing this allows for limiting the number of tests considerably.For example, consider an application that accepts an integer value between 1 and 100 (inclusive). Using equivalence partitioning, we can divide the input data into two equivalence classes:

  • Valid
  • Invalid

To be more precise, we could further divide it into three equivalence classes:

  • Class 1: Less than 1 (Invalid)
  • Class 2: Between 1 and 100 (Valid)
  • Class 3: Greater than 100 (Invalid)

Then we can write three tests, picking one representative from each class (e.g., 0, 50, and 101) to create our test cases. Doing so ensures a broad coverage with minimal test cases, making our testing process more efficient.

Boundary Value Analysis

This technique focuses on the values at the boundary of the input domain rather than the center. This technique is based on the principle that errors are most likely to occur at the boundaries of the input domain.The input domain represents the set of all possible inputs for a system. The boundaries are the edges of the input domain, representing minimum and maximum values.For example, if we expect a function to accept an integer between 1 and 100 (inclusive), the boundary values would be 1 and 100. With Boundary Value Analysis, we would create test cases for these values, values just outside the boundaries (like 0 and 101), and values just inside the boundaries (like 2 and 99).Boundary Value Analysis is a very efficient testing technique that provides good coverage with a relatively small number of test cases. However, it’s unsuitable for finding errors within the boundaries or for complex logic errors. Boundary Value Analysis should be used on top of other testing methods, such as equivalence partitioning and decision table testing, to ensure the software is as defect-free as possible.

Decision Table Testing

This technique uses a decision table to design test cases. A decision table is a table that shows all possible combinations of input values and their corresponding outputs.It’s handy for complex business rules that can be expressed in a table format, enabling testers to identify missing and extraneous test cases.For example, our system only allows access to a user with a valid username and password. Moreover, the system denies access to users when it is under maintenance. The decision table would have three conditions (username, password, and maintenance) and one action (allow access). The table would list all possible combinations of these conditions and the expected action for each combination. Here is an example:

Valid UsernameValid PasswordSystem under MaintenanceAllow Access
TrueTrueFalseYes
TrueTrueTrueNo
TrueFalseFalseNo
TrueFalseTrueNo
FalseTrueFalseNo
FalseTrueTrueNo
FalseFalseFalseNo
FalseFalseTrueNo

The main advantage of Decision Table Testing is that it ensures we test all possible input combinations. However, it can become complex and challenging to manage when systems have many input conditions, as the number of rules (and therefore test cases) increases exponentially with the number of conditions.