We usually use State Transition Testing to test software with a state machine since it tests the different system states and their transitions. It’s handy for systems where the system behavior can change based on its current state. For example, a program with states like “logged in” or “logged out”.To perform State Transition Testing, we need to identify the states of the system and then the possible transitions between the states. For each transition, we need to create a test case. The test case should test the software with the specified input values and verify that the software transitions to the correct state. For example, a user with the state “logged in” must transition to the state “logged out” after signing out.The main advantage of State Transition Testing is that it tests sequences of events, not just individual events, which could reveal defects not found by testing each event in isolation. However, State Transition Testing can become complex and time-consuming for systems with many states and transitions.
Use Case Testing
This technique validates that the system behaves as expected when used in a particular way by a user. Use cases could have formal descriptions, be user stories, or take any other form that fits your needs.A use case involves one or more actors executing steps or taking actions that should yield a particular result. A use case can include inputs and expected outputs. For example, when a user (actor) that is “signed in” (precondition) clicks the “sign out” button (action), then navigates to the profile page (action), the system denies access to the page and redirects the users to the sign in page, displaying an error message (expected behaviors).Use case testing is a systematic and structured approach to testing that helps identify defects in the software’s functionality. It is very user-centric, ensuring the software meets the users’ needs. However, creating test cases for complex use cases can be difficult. In the case of a user interface, the time to execute end-to-end tests of use cases can take a long time, especially as the number of tests grows.
It is an excellent approach to think of your test cases in terms of functionality to test, whether using a formal use case or just a line written on a napkin. The key is to test behaviors, not code.
Now that we have explored these techniques, it is time to introduce the xUnit library, ways to write tests, and how tests are written in the book. Let’s start by creating a test project.
This technique divides the input data of the software into different equivalence data classes and then tests these classes rather than individual inputs. An equivalence data class means that all values in that partition set should lead to the same outcome or yield the same result. Doing this allows for limiting the number of tests considerably.For example, consider an application that accepts an integer value between 1 and 100 (inclusive). Using equivalence partitioning, we can divide the input data into two equivalence classes:
Valid
Invalid
To be more precise, we could further divide it into three equivalence classes:
Class 1: Less than 1 (Invalid)
Class 2: Between 1 and 100 (Valid)
Class 3: Greater than 100 (Invalid)
Then we can write three tests, picking one representative from each class (e.g., 0, 50, and 101) to create our test cases. Doing so ensures a broad coverage with minimal test cases, making our testing process more efficient.
Boundary Value Analysis
This technique focuses on the values at the boundary of the input domain rather than the center. This technique is based on the principle that errors are most likely to occur at the boundaries of the input domain.The input domain represents the set of all possible inputs for a system. The boundaries are the edges of the input domain, representing minimum and maximum values.For example, if we expect a function to accept an integer between 1 and 100 (inclusive), the boundary values would be 1 and 100. With Boundary Value Analysis, we would create test cases for these values, values just outside the boundaries (like 0 and 101), and values just inside the boundaries (like 2 and 99).Boundary Value Analysis is a very efficient testing technique that provides good coverage with a relatively small number of test cases. However, it’s unsuitable for finding errors within the boundaries or for complex logic errors. Boundary Value Analysis should be used on top of other testing methods, such as equivalence partitioning and decision table testing, to ensure the software is as defect-free as possible.
Decision Table Testing
This technique uses a decision table to design test cases. A decision table is a table that shows all possible combinations of input values and their corresponding outputs.It’s handy for complex business rules that can be expressed in a table format, enabling testers to identify missing and extraneous test cases.For example, our system only allows access to a user with a valid username and password. Moreover, the system denies access to users when it is under maintenance. The decision table would have three conditions (username, password, and maintenance) and one action (allow access). The table would list all possible combinations of these conditions and the expected action for each combination. Here is an example:
Valid Username
Valid Password
System under Maintenance
Allow Access
True
True
False
Yes
True
True
True
No
True
False
False
No
True
False
True
No
False
True
False
No
False
True
True
No
False
False
False
No
False
False
True
No
The main advantage of Decision Table Testing is that it ensures we test all possible input combinations. However, it can become complex and challenging to manage when systems have many input conditions, as the number of rules (and therefore test cases) increases exponentially with the number of conditions.
There are various approaches to testing, such as behavior-driven development (BDD), acceptance test-driven development (ATDD), and test-driven development (TDD). The DevOps culture brings a mindset that embraces automated testing in line with its continuous integration (CI) and continuous deployment (CD) ideals. We can enable CD with a robust and healthy suite of tests that gives a high degree of confidence in our code, high enough to deploy the program when all tests pass without fear of introducing a bug.
TDD
TDD is a software development method that states that you should write one or more tests before writing the actual code. In a nutshell, you invert your development flow by following the Red-Green-Refactor technique, which goes like this:
You write a failing test (red).
You write just enough code to make your test pass (green).
You refactor that code to improve the design by ensuring all the tests pass.
We explore the meaning of refactoring next.
ATDD
ATDD is similar to TDD but focuses on acceptance (or functional) tests instead of software units and involves multiple parties like customers, developers, and testers.
BDD
BDD is another complementary technique originating from TDD and ATDD. BDD focuses on formulating test cases around application behaviors using spoken language and involves multiple parties like customers, developers, and testers. Moreover, practitioners of BDD often leverage the given–when–then grammar to formalize their test cases. Because of that, BDD output is in a human-readable format allowing stakeholders to consult such artifacts.The given–when–then template defines the way to describe the behavior of a user story or acceptance test, like this:
Given one or more preconditions (context)
When something happens (behavior)
Then one or more observable changes are expected (measurable side effects)
ATDD and BDD are great areas to dig deeper into and can help design better apps; defining precise user-centric specifications can help build only what is needed, prioritize better, and improve communication between parties. For the sake of simplicity, we stick to unit testing, integration testing, and a tad of TDD in the book. Nonetheless, let’s go back to the main track and define refactoring.
Refactoring
Refactoring is about (continually) improving the code without changing its behavior.An automated test suite should help you achieve that goal and should help you discover when you break something. No matter whether you do TDD or not, I do recommend refactoring as often as possible; this helps clean your codebase, and it should also help you get rid of some technical debt at the same time.Okay, but what is technical debt?
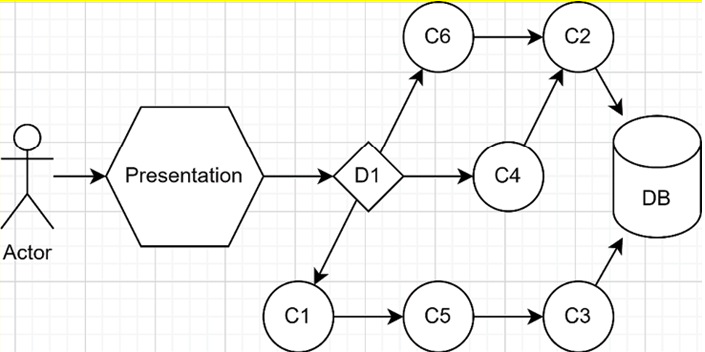
Next is a dependency map of a hypothetical system. We use that diagram to pick the most meaningful type of test possible for each piece of the program. In real life, that diagram will most likely be in your head, but I drew it out in this case. Let’s inspect that diagram before I explain its content:
Figure 2.2: Dependency map of a hypothetical system
In the diagram, the Actor can be anything from a user to another system. Presentation is the piece of the system that the Actor interacts with and forwards the request to the system itself (this could be a user interface). D1 is a component that has to decide what to do next based on the user input. C1 to C6 are other components of the system (could be classes, for example). DB is a database.D1 must choose between three code paths: interact with the components C1, C4, or C6. This type of logic is usually a good subject for unit tests, ensuring the algorithm yields the correct result based on the input parameter. Why pick a unit test? We can quickly test multiple scenarios, edge cases, out-of-bound data cases, and more. We usually mock the dependencies away in this type of test and assert that the subject under test made the expected call on the desired component.Then, if we look at the other code paths, we could write one or more integration tests for component C1, testing the whole chain in one go (C1, C5, and C3) instead of writing multiple mock-heavy unit tests for each component. If there is any logic that we need to test in components C1, C5, or C3, we can always add a few unit tests; that’s what they are for.Finally, C4 and C6 are both using C2. Depending on the code (that we don’t have here), we could write integration tests for C4 and C6, testing C2 simultaneously. Another way would be to unit test C4 and C6, and then write integration tests between C2 and the DB. If C2 has no logic, the latter could be the best and the fastest, while the former will most likely yield results that give you more confidence in your test suite in a continuous delivery model.When it is an option, I recommend evaluating the possibility of writing fewer meaningful integration tests that assert the correctness of a use case over a suite of mock-heavy unit tests. Remember always to keep the execution speed in mind.That may seem to go “against” the test pyramid, but does it? If you spend less time (thus lower costs) testing more use cases (adding more value), that sounds like a win to me. Moreover, we must not forget that mocking dependencies tends to make you waste time fighting the framework or other libraries instead of testing something meaningful and can add up to a high maintenance cost over time.Now that we have explored the fundamentals of automated testing, it is time to explore testing approaches and TDD, which is a way to apply those testing concepts.
Unit tests focus on individual units, like testing the outcome of a method. Unit tests should be fast and not rely on any infrastructure, such as a database. Those are the kinds of tests you want the most because they run fast, and each one tests a precise code path. They should also help you design your application better because you use your code in the tests, so you become its first consumer, leading to you finding some design flaws and making your code better. If you don’t like using your code in your tests, that is a good indicator that nobody else will. Unit tests should focus on testing algorithms (the ins and outs) and domain logic, not the code itself; how you wrote the code should have no impact on the intent of the test. For example, you are testing that a Purchase method executes the logic required to purchase one or more items, not that you created the variable X, Y, or Z inside that method.
Don’t discourage yourself if you find it challenging; writing a good test suite is not as easy as it sounds.
Integration testing
Integration tests focus on the interaction between components, such as what happens when a component queries the database or what happens when two components interact with each other.Integration tests often require some infrastructure to interact with, which makes them slower to run. By following the classic testing model, you want integration tests, but you want fewer of them than unit tests. An integration test can be very close to an E2E test but without using a production-like environment.
We will break the test pyramid rule later, so always be critical of rules and principles; sometimes, breaking or bending them can be better. For example, having one good integration test can be better than N unit tests; don’t discard that fact when writing your tests. See also Grey-box testing.
End-to-end testing
End-to-end tests focus on application-wide behaviors, such as what happens when a user clicks on a specific button, navigates to a particular page, posts a form, or sends a PUT request to some web API endpoint. E2E tests are usually run on infrastructure to test your application and deployment.
Other types of tests
There are other types of automated tests. For example, we could do load testing, performance testing, regression testing, contract testing, penetration testing, functional testing, smoke testing, and more. You can automate tests for anything you want to validate, but some tests are more challenging to automate or more fragile than others, such as UI tests.
If you can automate a test in a reasonable timeframe, think ROI: do it! In the long run, it should pay off.
One more thing; don’t blindly rely on metrics such as code coverage. Those metrics make for cute badges in your GitHub project’s readme.md file but can lead you off track, resulting in you writing useless tests. Don’t get me wrong, code coverage is a great metric when used correctly, but remember that one good test can be better than a lousy test suite covering 100% of your codebase. If you are using code coverage, ensure you and your team are not gaming the system.Writing good tests is not easy and comes with practice.
One piece of advice: keep your test suite healthy by adding missing test cases and removing obsolete or useless tests. Think about use case coverage, not how many lines of code are covered by your tests.
Before moving forward to testing styles, let’s inspect a hypothetical system and explore a more efficient way to test it.
Before you begin: Join our book community on Discord
Give your feedback straight to the author himself and chat to other early readers on our Discord server (find the “architecting-aspnet-core-apps-3e” channel under EARLY ACCESS SUBSCRIPTION).
This chapter focuses on automated testing and how helpful it can be for crafting better software. It also covers a few different types of tests and the foundation of test-driven development (TDD). We also outline how testable ASP.NET Core is and how much easier it is to test ASP.NET Core applications than old ASP.NET MVC applications. This chapter overviews automated testing, its principles, xUnit, ways to sample test values, and more. While other books cover this topic more in-depth, this chapter covers the foundational aspects of automated testing. We are using parts of this throughout the book, and this chapter ensures you have a strong enough base to understand the samples.In this chapter, we cover the following topics:
An overview of automated testing
Testing .NET applications
Important testing principles
Introduction to automated testing
Testing is an integral part of the development process, and automated testing becomes crucial in the long run. You can always run your ASP.NET Core website, open a browser, and click everywhere to test your features. That’s a legitimate approach, but it is harder to test individual rules or more complex algorithms that way. Another downside is the lack of automation; when you first start with a small app containing a few pages, endpoints, or features, it may be fast to perform those tests manually. However, as your app grows, it becomes more tedious, takes longer, and increases the likelihood of making a mistake. Of course, you will always need real users to test your applications, but you want those tests to focus on the UX, the content, or some experimental features you are building instead of bug reports that automated tests could have caught early on.There are multiple types of tests and techniques in the testing space. Here is a list of three broad categories that represent how we can divide automated testing from a code correctness standpoint:
Unit tests
Integration tests
End-to-end (E2E) tests
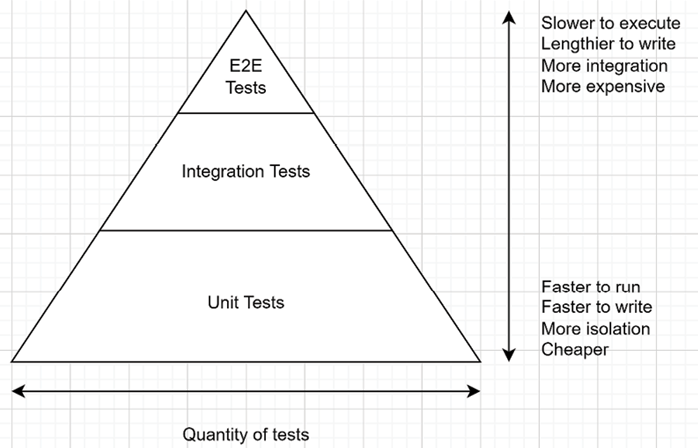
Usually, you want a mix of those tests, so you have fast unit tests testing your algorithms, slower tests that ensure the integrations between components are correct, and slow E2E tests that ensure the correctness of the system as a whole.The test pyramid is a good way of explaining a few concepts around automated testing. You want different granularity of tests and a different number of tests depending on their complexity and speed of execution. The following test pyramid shows the three types of tests stated above. However, we could add other types of tests in there as well. Moreover, that’s just an abstract guideline to give you an idea. The most important aspect is the return on investment (ROI) and execution speed. If you can write one integration test that covers a large surface and is fast enough, this might be worth doing instead of multiple unit tests.
Figure 2.1: The test pyramid
I cannot stress this enough; the execution speed of your tests is essential to receive fast feedback and know immediately that you have broken something with your code changes. Layering different types of tests allows you to execute only the fastest subset often, the not-so-fast occasionally, and the very slow tests infrequently. If your test suite is fast-enough, you don’t even have to worry about it. However, if you have a lot of manual or E2E UI tests that take hours to run, that’s another story (that can cost a lot of money).
Finally, on top of running your tests using a test runner, like in Visual Studio, VS Code, or the CLI, a great way to ensure code quality and leverage your automated tests is to run them in a CI pipeline, validating code changes for issues.Tech-wise, back when .NET Core was in pre-release, I discovered that the .NET team was using xUnit to test their code and that it was the only testing framework available. xUnit has become my favorite testing framework since, and we use it throughout the book. Moreover, the ASP.NET Core team made our life easier by designing ASP.NET Core for testability; testing is easier than before.Why are we talking about tests in an architectural book? Because testability is a sign of a good design. It also allows us to use tests instead of words to prove some concepts. In many code samples, the test cases are the consumers, making the program lighter without building an entire user interface and focusing on the patterns we are exploring instead of getting our focus scattered over some boilerplate UI code.
To ensure we do not deviate from the matter at hand, we use automated testing moderately in the book, but I strongly recommend that you continue to study it, as it will help improve your code and design
Now that we have covered all that, let’s explore those three types of tests, starting with unit testing.
Restore the dependencies (a.k.a. NuGet packages) based on the .csproj or .sln file present in the current dictionary.
dotnet build
Build the application based on the .csproj or .sln file present in the current dictionary. It implicitly runs the restore command first.
dotnet run
Run the current application based on the .csproj file present in the current dictionary. It implicitly runs the build and restore commands first.
dotnet watch run
Watch for file changes. When a file has changed, the CLI updates the code from that file using the hot-reload feature. When that is impossible, it rebuilds the application and then reruns it (equivalent to executing the run command again). If it is a web application, the page should refresh automatically.
dotnet test
Run the tests based on the .csproj or .sln file present in the current directory. It implicitly runs the build and restore commands first. We cover testing in the next chapter.
dotnet watch test
Watch for file changes. When a file has changed, the CLI reruns the tests (equivalent to executing the test command again).
dotnet publish
Publish the current application, based on the .csproj or .sln file present in the current directory, to a directory or remote location, such as a hosting provider. It implicitly runs the build and restore commands first.
dotnet pack
Create a NuGet package based on the .csproj or .sln file present in the current directory. It implicitly runs the build and restore commands first. You don’t need a .nuspec file.
dotnet clean
Clean the build(s) output of a project or solution based on the .csproj or .sln file present in the current directory.
Technical requirements
Throughout the book, we will explore and write code. I recommend installing Visual Studio, Visual Studio Code, or both to help with that. I use Visual Studio and Visual Studio Code. Other alternatives are Visual Studio for Mac, Riders, or any other text editor you choose.Unless you install Visual Studio, which comes with the .NET SDK, you may need to install it. The SDK comes with the CLI we explored earlier and the build tools for running and testing your programs. Look at the README.md file in the GitHub repository for more information and links to those resources.The source code of all chapters is available for download on GitHub at the following address: https://adpg.link/net6.
Summary
This chapter looked at design patterns, anti-patterns, and code smells. We also explored a few of them. We then moved on to a recap of a typical web application’s request/response cycle.We continued by exploring .NET essentials, such as SDK versus runtime and app targets versus .NET Standard. We then dug a little more into the .NET CLI, where I laid down a list of essential commands, including dotnet build and dotnet watch run. We also covered how to create new projects. This has set us up to explore the different possibilities we have when building our .NET applications.In the next two chapters, we explore automated testing and architectural principles. These are foundational chapters for building robust, flexible, and maintainable applications.