Category Don’t repeat yourself (DRY)

Technical debt – Automated Testing

Technical debt represents the corners you cut short while developing a feature or a system. That happens no matter how hard you try because life is life, and there are delays, deadlines, budgets, and people, including developers (yes, that’s you and me).The most crucial point is understanding that you cannot avoid technical debt altogether, so it’s better to embrace that fact and learn to live with it instead of fighting it. From that point forward, you can only try to limit the amount of technical debt you, or someone else, generate and ensure to always refactor some of it over time each sprint (or the unit of time that fits your projects/team/process).One way to limit the piling up of technical debt is to refactor the code often. So, factor the refactoring time into your time estimates. Another way is to improve collaboration between all the parties involved. Everyone must work toward the same goal if you want your projects to succeed.You will sometimes cut the usage of best practices short due to external forces like people or time constraints. The key is coming back at it as soon as possible to repay that technical debt, and automated tests are there to help you refactor that code and eliminate that debt elegantly. Depending on the size of your workplace, there will be more or less people between you and that decision.

Some of these things might be out of your control, so you may have to live with more technical debt than you had hoped. However, even when things are out of your control, nothing stops you from becoming a pioneer and working toward improving the enterprise’s culture. Don’t be afraid to become an agent of change and lead the charge.

Nevertheless, don’t let the technical debt pile up too high, or you may not be able to pay it back, and at some point, that’s where a project begins to break and fail. Don’t be mistaken; a project in production can be a failure. Delivering a product does not guarantee success, and I’m talking about the quality of the code here, not the amount of generated revenue (I’ll leave that to other people to evaluate).Next, we look at different ways to write tests, requiring more or less knowledge of the inner working of the code.

Testing techniques

Here we look at different ways to approach our tests. Should we know the code? Should we test user inputs and compare them against the system results? How to identify a proper value sample? Let’s start with white-box testing.

White-box testing

White-box testing is a software testing technique that uses knowledge of the internal structure of the software to design tests. We can use white-box testing to find defects in the software’s logic, data structures, and algorithms.

This type of testing is also known as clear-box testing, open-box testing, transparent-box testing, glass-box testing, and code-based testing.

Another benefit of white-box testing is that it can help optimize the code. By reviewing the code to write tests, developers can identify and improve inefficient code structures, improving overall software performance. The developer can also improve the application design by finding architectural issues while testing the code.

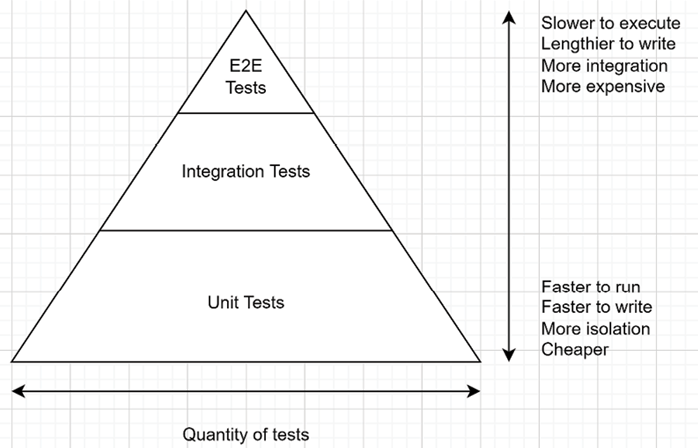
White-box testing encompasses most unit and integration tests.

Next, we look at black-box testing, the opposite of white-box testing.

Introduction to automated testing – Automated Testing

Before you begin: Join our book community on Discord

Give your feedback straight to the author himself and chat to other early readers on our Discord server (find the “architecting-aspnet-core-apps-3e” channel under EARLY ACCESS SUBSCRIPTION).

https://packt.link/EarlyAccess

This chapter focuses on automated testing and how helpful it can be for crafting better software. It also covers a few different types of tests and the foundation of test-driven development (TDD). We also outline how testable ASP.NET Core is and how much easier it is to test ASP.NET Core applications than old ASP.NET MVC applications. This chapter overviews automated testing, its principles, xUnit, ways to sample test values, and more. While other books cover this topic more in-depth, this chapter covers the foundational aspects of automated testing. We are using parts of this throughout the book, and this chapter ensures you have a strong enough base to understand the samples.In this chapter, we cover the following topics:

  • An overview of automated testing
  • Testing .NET applications
  • Important testing principles

Introduction to automated testing

Testing is an integral part of the development process, and automated testing becomes crucial in the long run. You can always run your ASP.NET Core website, open a browser, and click everywhere to test your features. That’s a legitimate approach, but it is harder to test individual rules or more complex algorithms that way. Another downside is the lack of automation; when you first start with a small app containing a few pages, endpoints, or features, it may be fast to perform those tests manually. However, as your app grows, it becomes more tedious, takes longer, and increases the likelihood of making a mistake. Of course, you will always need real users to test your applications, but you want those tests to focus on the UX, the content, or some experimental features you are building instead of bug reports that automated tests could have caught early on.There are multiple types of tests and techniques in the testing space. Here is a list of three broad categories that represent how we can divide automated testing from a code correctness standpoint:

  • Unit tests
  • Integration tests
  • End-to-end (E2E) tests

Usually, you want a mix of those tests, so you have fast unit tests testing your algorithms, slower tests that ensure the integrations between components are correct, and slow E2E tests that ensure the correctness of the system as a whole.The test pyramid is a good way of explaining a few concepts around automated testing. You want different granularity of tests and a different number of tests depending on their complexity and speed of execution. The following test pyramid shows the three types of tests stated above. However, we could add other types of tests in there as well. Moreover, that’s just an abstract guideline to give you an idea. The most important aspect is the return on investment (ROI) and execution speed. If you can write one integration test that covers a large surface and is fast enough, this might be worth doing instead of multiple unit tests.

 Figure 2.1: The test pyramidFigure 2.1: The test pyramid 

I cannot stress this enough; the execution speed of your tests is essential to receive fast feedback and know immediately that you have broken something with your code changes. Layering different types of tests allows you to execute only the fastest subset often, the not-so-fast occasionally, and the very slow tests infrequently. If your test suite is fast-enough, you don’t even have to worry about it. However, if you have a lot of manual or E2E UI tests that take hours to run, that’s another story (that can cost a lot of money).

Finally, on top of running your tests using a test runner, like in Visual Studio, VS Code, or the CLI, a great way to ensure code quality and leverage your automated tests is to run them in a CI pipeline, validating code changes for issues.Tech-wise, back when .NET Core was in pre-release, I discovered that the .NET team was using xUnit to test their code and that it was the only testing framework available. xUnit has become my favorite testing framework since, and we use it throughout the book. Moreover, the ASP.NET Core team made our life easier by designing ASP.NET Core for testability; testing is easier than before.Why are we talking about tests in an architectural book? Because testability is a sign of a good design. It also allows us to use tests instead of words to prove some concepts. In many code samples, the test cases are the consumers, making the program lighter without building an entire user interface and focusing on the patterns we are exploring instead of getting our focus scattered over some boilerplate UI code.

To ensure we do not deviate from the matter at hand, we use automated testing moderately in the book, but I strongly recommend that you continue to study it, as it will help improve your code and design

Now that we have covered all that, let’s explore those three types of tests, starting with unit testing.

Command Description – Introduction

CommandDescription
dotnet restoreRestore the dependencies (a.k.a. NuGet packages) based on the .csproj or .sln file present in the current dictionary.
dotnet buildBuild the application based on the .csproj or .sln file present in the current dictionary. It implicitly runs the restore command first.
dotnet runRun the current application based on the .csproj file present in the current dictionary. It implicitly runs the build and restore commands first.
dotnet watch runWatch for file changes. When a file has changed, the CLI updates the code from that file using the hot-reload feature. When that is impossible, it rebuilds the application and then reruns it (equivalent to executing the run command again). If it is a web application, the page should refresh automatically.
dotnet testRun the tests based on the .csproj or .sln file present in the current directory. It implicitly runs the build and restore commands first. We cover testing in the next chapter.
dotnet watch testWatch for file changes. When a file has changed, the CLI reruns the tests (equivalent to executing the test command again).
dotnet publishPublish the current application, based on the .csproj or .sln file present in the current directory, to a directory or remote location, such as a hosting provider. It implicitly runs the build and restore commands first.
dotnet packCreate a NuGet package based on the .csproj or .sln file present in the current directory. It implicitly runs the build and restore commands first. You don’t need a .nuspec file.
dotnet cleanClean the build(s) output of a project or solution based on the .csproj or .sln file present in the current directory.

Technical requirements

Throughout the book, we will explore and write code. I recommend installing Visual Studio, Visual Studio Code, or both to help with that. I use Visual Studio and Visual Studio Code. Other alternatives are Visual Studio for Mac, Riders, or any other text editor you choose.Unless you install Visual Studio, which comes with the .NET SDK, you may need to install it. The SDK comes with the CLI we explored earlier and the build tools for running and testing your programs. Look at the README.md file in the GitHub repository for more information and links to those resources.The source code of all chapters is available for download on GitHub at the following address: https://adpg.link/net6.

Summary

This chapter looked at design patterns, anti-patterns, and code smells. We also explored a few of them. We then moved on to a recap of a typical web application’s request/response cycle.We continued by exploring .NET essentials, such as SDK versus runtime and app targets versus .NET Standard. We then dug a little more into the .NET CLI, where I laid down a list of essential commands, including dotnet build and dotnet watch run. We also covered how to create new projects. This has set us up to explore the different possibilities we have when building our .NET applications.In the next two chapters, we explore automated testing and architectural principles. These are foundational chapters for building robust, flexible, and maintainable applications.

Note – Introduction

I’m sure we will see .NET Standard libraries stick around for a while. All projects will not just migrate from .NET Framework to .NET 5+ magically, and people will want to continue sharing code between the two.

The next versions of .NET are built over .NET 5+, while .NET Framework 4.X will stay where it is today, receiving only security patches and minor updates. For example, .NET 8 is built over .NET 7, iterating over .NET 6 and 5.Next, let’s look at some tools and code editors.

Visual Studio Code versus Visual Studio versus the command-line interface

How can one of these projects be created? .NET Core comes with the dotnet command-line interface (CLI), which exposes multiple commands, including new. Running the dotnet new command in a terminal generates a new project.To create an empty class library, we can run the following commands:

md MyProject
cd MyProject
dotnet new classlib

That would generate an empty class library in the newly created MyProject directory.The -h option helps discover available commands and their options. For example, you can use dotnet -h to find the available SDK commands or dotnet new -h to find out about options and available templates.It is fantastic that .NET now has the dotnet CLI. The CLI enables us to automate our workflows in continuous integration (CI) pipelines while developing locally or through any other process.The CLI also makes it easier to write documentation that anyone can follow; writing a few commands in a terminal is way easier and faster than installing programs like Visual Studio and emulators.Visual Studio Code is my favourite text editor. I don’t use it much for .NET coding, but I still do to reorganize projects, when it’s CLI time, or for any other task that is easier to complete using a text editor, such as writing documentation using Markdown, writing JavaScript or TypeScript, or managing JSON, YAML, or XML files. To create a C# project, a Visual Studio solution, or to add a NuGet package using Visual Studio Code, open a terminal and use the CLI.As for Visual Studio, my favourite C# IDE, it uses the CLI under the hood to create the same projects, making it consistent between tools and just adding a user interface on top of the dotnet new CLI command.You can create and install additional dotnet new project templates in the CLI or even create global tools. You can also use another code editor or IDE if you prefer. Those topics are beyond the scope of this book.

An overview of project templates

Here is an example of the templates that are installed (dotnet new –list):

 Figure 1.1: Project templatesFigure 1.1: Project templates 

A study of all the templates is beyond the scope of this book, but I’d like to visit the few that are worth mentioning, some of which we will use later:

  • dotnet new console creates a console application
  • dotnet new classlib creates a class library
  • dotnet new xunit creates an xUnit test project
  • dotnet new web creates an empty web project
  • dotnet new mvc scaffolds an MVC application
  • dotnet new webapi scaffolds a web API application

Running and building your program

If you are using Visual Studio, you can always hit the play button, or F5, and run your app. If you are using the CLI, you can use one of the following commands (and more). Each of them also offers different options to control their behaviour. Add the -h flag with any command to get help on that command, such as dotnet build -h:

Getting started with .NET – Introduction

A bit of history: .NET Framework 1.0 was first released in 2002. .NET is a managed framework that compiles your code into an Intermediate Language (IL) named Microsoft Intermediate Language (MSIL). That IL code is then compiled into native code and executed by the Common Language Runtime (CLR). The CLR is now known simply as the .NET runtime. After releasing several versions of .NET Framework, Microsoft never delivered on the promise of an interoperable stack. Moreover, many flaws were built into the core of .NET Framework, tying it to Windows.Mono, an open-source project, was developed by the community to enable .NET code to run on non-Windows OSes. Mono was used and supported by Xamarin, acquired by Microsoft in 2016. Mono enabled .NET code to run on other OSes like Android and iOS. Later, Microsoft started to develop an official cross-platform .NET SDK and runtime they named .NET Core.The .NET team did a magnificent job building ASP.NET Core from the ground up, cutting out compatibility with the older .NET Framework versions. That brought its share of problems at first, but .NET Standard alleviated the interoperability issues between the old .NET and the new .NET.After years of improvements and two major versions in parallel (Core and Framework), Microsoft reunified most .NET technologies into .NET 5+ and the promise of a shared Base Class Library (BCL). With .NET 5, .NET Core simply became .NET while ASP.NET Core remained ASP.NET Core. There is no .NET “Core” 4, to avoid any potential confusion with .NET Framework 4.X.New major versions of .NET release every year now. Even-number releases are Long-Term Support (LTS) releases with free support for 3 years, and odd-number releases (Current) have free support for only 18 months.The good thing behind this book is that the architectural principles and design patterns covered should remain relevant in the future and are not tightly coupled with the versions of .NET you are using. Minor changes to the code samples should be enough to migrate your knowledge and code to new versions.Next, let’s cover some key information about the .NET ecosystem.

.NET SDK versus runtime

You can install different binaries grouped under SDKs and runtimes. The SDK allows you to build and run .NET programs, while the runtime only allows you to run .NET programs.As a developer, you want to install the SDK on your deployment environment. On the server, you want to install the runtime. The runtime is lighter, while the SDK contains more tools, including the runtime.

.NET 5+ versus .NET Standard

When building .NET projects, there are multiple types of projects, but basically, we can separate them into two categories:

  • Applications
  • Libraries

Applications target a version of .NET, such as net5.0 and net6.0. Examples of that would be an ASP.NET application or a console application.Libraries are bundles of code compiled together, often distributed as a NuGet package. .NET Standard class library projects allow sharing code between .NET 5+, and .NET Framework projects. .NET Standard came into play to bridge the compatibility gap between .NET Core and .NET Framework, which eased the transition. Things were not easy when .NET Core 1.0 first came out.With .NET 5 unifying all the platforms and becoming the future of the unified .NET ecosystem, .NET Standard is no longer needed. Moreover, app and library authors should target the base Target Framework Moniker (TFM), for example, net8.0. You can also target netstandard2.0 or netstandard2.1 when needed, for example, to share code with .NET Framework. Microsoft also introduced OS-specific TFMs with .NET 5+, allowing code to use OS-specific APIs like net8.0-android and net8.0-tvos. You can also target multiple TFMs when needed.

Important note about cookies – Introduction

The client sends cookies, and the server returns them for every request-response cycle. This could kill your bandwidth or slow down your application if you pass too much information back and forth (cookies or otherwise). One good example would be a serialized identity cookie that is very large.

Another example, unrelated to cookies but that created such a back-and-forth, was the good old Web Forms ViewState. This was a hidden field sent with every request. That field could become very large when left unchecked.

Nowadays, with high-speed internet, it is easy to forget about those issues, but they can significantly impact the user experience of someone on a slow network.

When the server decides to respond to the request, it returns a header and an optional body, following the same principles as the request. The first line indicates the request’s status: whether it was successful. In our case, the status code was 200, which indicates success. Each server can add more or less information to its response. You can also customize the response with code.Here is the response to the previous request:

HTTP/1.1 200 OK
Server: GitHub.com
Content-Type: text/html; charset=utf-8
Last-Modified: Wed, 03 Oct 2018 21:35:40 GMT
ETag: W/”5bb5362c-f677″
Access-Control-Allow-Origin: *
Expires: Fri, 07 Dec 2018 02:11:07 GMT
Cache-Control: max-age=600
Content-Encoding: gzip
X-GitHub-Request-Id: 32CE:1953:F1022C:1350142:5C09D460
Content-Length: 10055
Accept-Ranges: bytes
Date: Fri, 07 Dec 2018 02:42:05 GMT
Via: 1.1 varnish
Age: 35
Connection: keep-alive
X-Served-By: cache-ord1737-ORD
X-Cache: HIT
X-Cache-Hits: 2
X-Timer: S1544150525.288285,VS0,VE0
Vary: Accept-Encoding
X-Fastly-Request-ID: 98a36fb1b5642c8041b88ceace73f25caaf07746
<Response body truncated for brevity>

Now that the browser has received the server’s response, it renders the HTML webpage. Then, for each resource, it sends another HTTP call to its URI and loads it. A resource is an external asset, such as an image, a JavaScript file, a CSS file, or a font.After the response, the server is no longer aware of the client; the communication has ended. It is essential to understand that to create a pseudo-state between each request, we need to use an external mechanism. That mechanism could be the session-state leveraging cookies, simply using cookies, or some other ASP.NET Core mechanisms, or we could create a stateless application. I recommend going stateless whenever possible. We write primarily stateless applications in the book.

Note

If you want to learn more about session and state management, I left a link in the Further reading section at the end of the chapter.

As you can imagine, the backbone of the internet is its networking stack. The Hypertext Transfer Protocol (HTTP) is the highest layer of that stack (layer 7). HTTP is an application layer built on the Transmission Control Protocol (TCP). TCP (layer 4) is the transport layer, which defines how data is moved over the network (for instance, the transmission of data, the amount of transmitted data, and error checking). TCP uses the Internet Protocol (IP) layer to reach the computer it tries to talk to. IP (layer 3) represents the network layer, which handles packet IP addressing.A packet is a chunk of data that is transmitted over the wire. We could send a large file directly from a source to a destination machine, but that is not practical, so the network stack breaks down large items into smaller packets. For example, the source machine breaks a file into multiple packets, sends them to the target machine, and then the target reassembles them back into the source file. This process allows numerous senders to use the same wire instead of waiting for the first transmission to be done. If a packet gets lost in transit, the source machine can also send only that packet back to the target machine.Rest assured, you don’t need to understand every detail behind networking to program web applications, but it is always good to know that HTTP uses TCP/IP and chunks big payloads into smaller packets. Moreover, HTTP/1 limits the number of parallel requests a browser can open simultaneously. This knowledge can help you optimize your apps. For example, a high number of assets to load, their size, and the order in which they are sent to the browser can increase the page load time, the perceived page load time, or the paint time.To conclude this subject and not dig too deep into networking, HTTP/1 is older but foundational. HTTP/2 is more efficient and supports streaming multiple assets using the same TCP connection. It also allows the server to send assets to the client before it requests the resources, called a server push.If you find HTTP interesting, HTTP/2 is an excellent place to start digging deeper, as well as the HTTP/3 proposed standard that uses the QUIC transport protocol instead of HTTP (RFC 9114). ASP.NET Core 7.0+ supports HTTP/3, which is enabled by default in ASP.NET Core 8.0.Next, let’s quickly explore .NET.